Windows server 2012: PFX Certificates and SNI feature under IIS 8.0
Unless you’ve been living underground for the last few weeks, you should have already heard that Windows server 2012 RTM is available :-). Last time I blogged about this operating system it was still named Windows server 8 Developer Preview. I will describe in this post how IIS 8 supports multiple SSL website certificates on a single IP and port, this feature is called Server Name Indication (SNI), and supported under Apache since version 2.2.12… I will also talk about the new features provided in Windows server 2012 for exporting/importing certificates in the PFX file format, in order to deploy certificates on a Webserver farm.
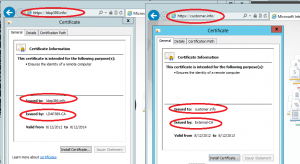
To configure multiple websites on IIS 8 with the SNI feature, I suggest you read this article, which is a step by step configuration guide. We installed one IIS 8 server and deployed two certificates in the Web Hosting computer’s certificate store: The subject of the certificate issued by our internal CA LDAP389-CA is ldap389.info. The subject of the second certificate issued by an external CA External-CA is customer.info.
We checked the SSL bindings of our websites with the netsh command line utility:
netsh http show sslcert |
On the left hand side of the following picture the Web Hosting computer’s certificate store is displayed, on the right hand side you can see the result of the netsh command: Both certificates are configured on the same port, both aliases ldap389.info and customer.info share the same IP address:
On the client side, depending on the URL you typed in your browser, the appropriate certificate is selected as long as your client supports SNI. For MS products it means at least Windows Vista and IE 7.0 (no support under Windows XP, whatever the IE version you are using):
Once the first web server of our farm is configured, we want to automate the certificate import process on the remaining webservers. In order to perform this task we will use the PKI client Cmdlets introduced in Windows server 2012 and Windows 8. With IIS 8, it is also possible to use a centralized certificate store for you webserver farm, for the step by step configuration read this article. The major constraint of this feature is that all your PFX files must share the same protection password. So we will stick with the old fashioned way: An export/import of each certificate in PFX format.
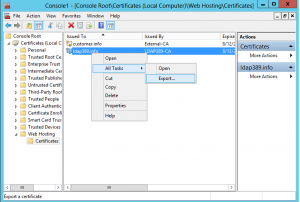
Let’s do this task with the GUI, in order to see what new features are available with Windows server 2012 and Windows 8: First, we export the certificate in PFX format (with its private key):
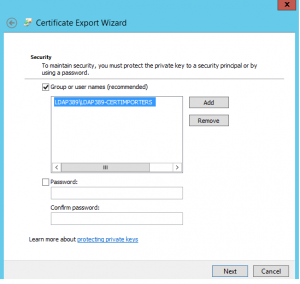
When the traditonal dialog box asking us to protect the PFX file with a password appears, we notice a new feature: You can choose instead to protect the file with an AD user or group, only the user or members of the group you selected will be allowed to access the certificate’s private key, you do not need anymore to protect the file with a password :-). We choose to grant the access to the PFX file to a group named LDAP389-CERTIMPORTERS, only the members of this group will be allowed to import the certificate with its private key to another computer:
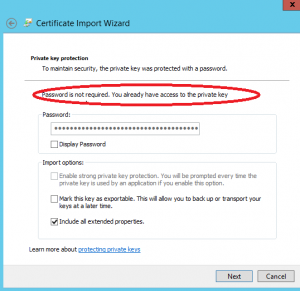
This feature is only available if your webservers authenticate against a Windows server 2012 domain controller. Now, let’s import the certificate into another webserver, with an account member of the LDAP389-CERTIMPORTERS group: The password is not required, and the import is done automatically:
Now let’s perform the same task with Powershell and the PKI client Cmdlets. First we use the Export-PfxCertificate cmdlet in order to create the PFX file. We need to pipe the certificate object into the Export-PfxCertificate command. In order to retrieve the certificate object located in the Web Hosting computer’s certificate store you need to get its thumbprint, to retrieve this information just launch the follwing commands:
cd Cert:\localmachine\webhosting dir |
The thumbprint of the customer.info certificate is 1CA7EBB210086CCC1D9D4DA12B3E333FA851D090.
In order to export the customer.info certificate and the entire chain into the ldap389customer.pfx file use the following onliner:
Get-ChildItem -Path cert:\localMachine\WebHosting\1CA7EBB210086CCC1D9D4DA12B3E333FA851D090 | Export-PfxCertificate -FilePath C:\ldap389customer.pfx -ProtectTo "LDAP389\LDAP389-CERTIMPORTERS" -ChainOption BuildChain |
The ProtectTo parameter allows you to specify which AD user/group will be able to access to the certificate’s private key. Export the ldap389.info certificate with the same method.
Now we need to import our two PFX files to another webserver, log in with a member account from the LDAP389-CERTIMPORTERS group and use the Import-PfxCertificate cmdlet. The customer.info certificate is imported into the Web Hosting computer’s certificate store with the following command:
Import-PfxCertificate -FilePath c:\ldap389customer.pfx cert:\localMachine\WebHosting\ |
Do the same with the ldap389.info certificate:
Both certificates are successfuly installed on our second webserver and ready for use with IIS 8 and the SNI feature. Finally import the two certificates on the remaining webservers of your farm.
This post is also available in: French


